
Pouch & Bandolier
| Beading and Designs by David Mott and in 19th Century Seminole Men`s Clothing
|
|
Pouch & Bandolier
| Beading and Designs by David Mott and in 19th Century Seminole Men`s Clothing
|
The beading technique is the two-needle, or two-thread, applique
method. The most common bead size used is equivalent to our current
12/0 size. Native American crafters weren't necessarily consistent
on bead sizes within a single piece, but the range is still within
11/0 and 13/0. This style of beading is simple, and certainly
does not require a loom.
Older opaque colors are to be preferred; in darker colors, sometimes
transparents and infrequently cuts. Look for dull white instead
of bright white, salmon or rose instead of pink, greasy yellow
or mustard instead of yellow or gold, crimson or wine red instead
of bright red, and dark blue instead of royal blue. Light blue
is pastel, and turquoise is not bright. A good Indian hobbyist
catalog will carry these, and if you have to spend a little extra
to get the old style colors, it will be well worth it.
The colors should contrast with the strouding color and with each
other. (See Appendix *1) COLORS, for an idea of how few colors
were usually used on a single item.)
 A distinction between Seminole
and Creek or Cherokee pouches and bandoliers is that the elements
in a Seminole repeating design are much less likely to be connecting
in a rolling repeating curve. In fact, many Seminole designs are
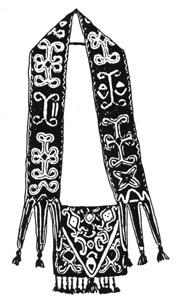
isolated elements, not linearly connected at all. Most pouches
had designs that coordinated with those on the attached bandolier.
The pouch design is usually (but not always) bilaterally symmetrical.
That is, like people, the left half is a rough mirror image of
the right half. The whole flap was often fully beaded. The pouch
was not beaded on the back and not always filled in completely
where the flap lay over the front of it, but the front side could
be fully beaded or partially beaded.
A distinction between Seminole
and Creek or Cherokee pouches and bandoliers is that the elements
in a Seminole repeating design are much less likely to be connecting
in a rolling repeating curve. In fact, many Seminole designs are
isolated elements, not linearly connected at all. Most pouches
had designs that coordinated with those on the attached bandolier.
The pouch design is usually (but not always) bilaterally symmetrical.
That is, like people, the left half is a rough mirror image of
the right half. The whole flap was often fully beaded. The pouch
was not beaded on the back and not always filled in completely
where the flap lay over the front of it, but the front side could
be fully beaded or partially beaded.
The bandolier is another story. The design on one half of its
length could be completely different from what's on the other
half. So, a wearer might seem to be wearing two completely different
bandoliers when seen from the front or from the back. Occasionally,
an isolated design element might appear where the two halves meet
on the shoulder. The author feels that this change may be more
from boredom in construction than from any specific intent. There
are, however, a few bandoliers with consistent design through
their whole length. No bandolier is fully headed.

The designs, especially Seminole motifs, can be repeating, geometrical
(but not with rigid straight lines or sharp corners), and representational
(but not really pictorial). This may not be so much stylistic
preference as much as required by the limitations of working with
linear strings of beads.
Here are a few patterns noted on some pouches and bandoliers.
The names have been assigned by the author for ready referral;
there is no indication at all that they were actually intended
to represent any of these.
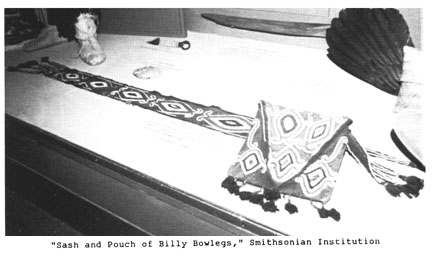
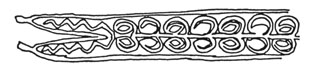
RATTLESNAKE: Appears in the bandolier of Billy Bowlegs
in his photographs and engravings, although not on the example
in the Smithsonian ascribed to him. Although the pattern strongly
resembles Seminole heddle loom beaded sashes of the late 19th
and early 20th centuries, this is definitely an applique beaded
sash.

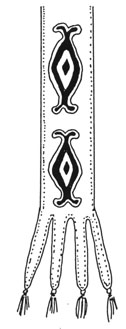
RECURVE DIAMOND: Perhaps the most popular motif
among 19th century Seminoles. It s several variations appear on
a majority of the examples studied. That the design was enduring
Is Indicated by the fact that it appears on one made by a Seminole
in the early 1950's, commissioned by William C. Sturtevant.

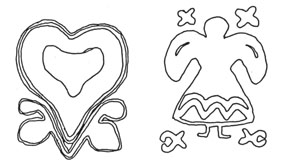 HEART: Appeared
on a pouch recent1y sold to a private collector.
HEART: Appeared
on a pouch recent1y sold to a private collector.
ANGEL: (or, female figure): Appears on several bandoliers.
It seems appropriate, in that it was women who made the pouches
and bandoliers.
MAN: On a single example.
SWASTIKA: A familiar motif throughout all of Native
American art. Note, however, the direction of rotation. The opposite
direction represented bad luck or misfortune.
FLORAL: In Seminole examples, this is mostly limited
to leaves. More fully floral beadwork is more typical of Creek
or Cherokee examples. A mixture of floral and diamond is on Cat1ln's
painting of Osceola (although we should be cautious of Catlln's
details.)
Sketch out your chosen motifs, and mark the outlines on your strouding.
An option is to draw the design on regular writing paper. Lay
the paper on the wool, and sew the first outline string of beads
down onto the wool through the paper. When the outline is sewn
down, the paper can easily be separated and the rest of the beadwork
filled in with the outline.
But, given the usually irregular, uneven appearance of elements
in Seminole designs, it is highly unlikely that they used either
drawn or paper outlines. They probably started out with an idea
of what they wanted, possibly with a rough sketch off to the side,
and did the whole thing freehand. Perfectly repeated patterns,
or even very straight lines, are not to be expected in Seminole
pouches and bandoliers.
ORDER ENOUGH BEADS FOR YOUR PROJECT… size 12/0 beads
are very small, so one or two hanks is hardly enough for the project.
Ten to fifteen hanks can easily be used on the bandolier alone.
Figure each hank can cover about four to five square inches of
solid beadwork.
Remember, also, to order thread and needles that match your bead
size. The author recommends #13 needles and extra fine or FF thread.
Some beeswax needs to be on hand to wax the thread periodically.
One source does discourage thread waxing because they feel that
it might discolor the wool.
If this is your first try at any kind of beading, it's recommended
that you start with a simple motif on the bandolier.
Cut the beads off of a hank into a shallow saucer or small plate.
A Frisbee works finer For storage, 16mm film canisters or old
cellophane tape cans have lids that can be closed tight. Wax a
yard of thread to hold the beads. Pull the thread through the
needle until the needle is in the middle of the length of thread.
Knot the two ends together with three passes of an overhand knot.
Run the thread through the wool with the knot on the outside of
it, the side of the wool the beads will be appliqued onto. Pass
the needle back through the wool again, close to the starting
knot, so the thread_is again on the outside.
An easy way to string the desired beads is to run the needle through
the loose beads in a scooping motion. Or, you can slowly and tediously
put one bead at a time on the needle. Repeat until you've accumulated
a long string of beads. Cut another yard of thread, wax it, but
keep this thread as a single strand. Start it out close to the
stringed beads, with the knot also on the outside. Cross over
the bead thread, tacking it down every few beads to the fabric.
You are not sewing down the beads, you are sewing down the thread
that carries the beads. Keep both the beads on the thread and
your tacking stitches drawn tight. The beads between each tack
would be more on a straight run, such as four or five, and less
on curves, perhaps two or three between each stitch. If the beads
and stitches are loose, the beads will sag. If the beads and stitching
is too tight, the completed beaded pattern will bulge up. Different
tensions will be called for different kinds of lines. Check periodically
to see if all is well on the underside of the wool.
Eventually, either the bead thread or the applique thread will
begin to run out, or you will finish with this particular bead
colon If the applique thread runs out...
Make two or three passes over the last stitch in front of the
last bead. Run the applique thread through to the wool's underside,
and run the thread through these last few stitches, passing the
needle through the loop you create. If there are other beads to
add, start threads as before, and finish.
If the bead thread runs out shy of completing the motif, or if
you are finished with one color and want to start another...
Pull the beads tight, and enter the wool with the needle without
breaking the surface, and run the needle through the created loop.
Again, do this at least twice over.
Remember to keep all your beadwork relatively tight, as needed.
Take your time. Set the project aside when you get tired. You
may want to work at it in stages, setting a goal to complete a
part of the design or a particular color at a sitting.
Seminole Bandolier Attachment & Conclusions
Appendix & References for Seminole Pouches & Bandoliers
Return to the Introduction to Seminole Pouches & Bandoliers
Complete Index to Articles in 19th Century Seminole Mens Clothing

|
Text and Graphics
© 1994 - Tara Prindle unless otherwise cited. |