 |
The Single-quill Line Technique contributed by Nancy Fonicello |
| Pouch made by Tara using the Line-quilling Technique. The red quills were dyed with brazilwood. |
 |
The Single-quill Line Technique contributed by Nancy Fonicello |
| Pouch made by Tara using the Line-quilling Technique. The red quills were dyed with brazilwood. |
The single-quill line technique is the third of what would be considered the "basic" quillwork stitches. It is executed in exactly the same way as the parallel band technique, except that now we are using one thread instead of two, and the quill is left whole and not trimmed until the work is completed. If you have ever seen old examples of Huron moccasins you would certainly be impressed by the beautiful designs that are possible using this stitch. It tends to be more time consuming that the first two techniques because there are more stitches per inch, but it also is more durable because there is less surface area of each quill exposed.
If you are just beginning, it would be well to look at the discussion of tools and materials in another section of this site:
|
Tools and Materials |
This technique does not require you to snip off the ends of the quills before you begin. Using the whole quill enables you to make nice round stitches, as an untrimmed quill acts somewhat like a balloon with air in it. Also, do not flatten the quills ahead of time or else you will get kinks and sharp edges that won't look quite right in your finished work. All ends will be trimmed off later with a sharp knife or pair of scissors.
Soak the quills in water to soften them as before. This time only draw ONE line on the leather where you want the embroidery to be. You may not even need to draw lines, especially if you are laying down several lanes of stitching close together - just use your first line for the guide for all your other stitches.

| Anchor the thread as before, taking a few running stitches in the leather. Bring the thread up to the beginning of your line where you want your first quill to be and make a little loop using the back stitch. Insert the end of your first quill under the loop and pull it tight. This picture shows the first quill stitched down and ready for the next stitch. |

| Flip the quill up, and take a stitch around it as if you were going to do the top line of the parallel band technique. This involves wrapping the thread around the quill so that it will bend away from you when the stitch is pulled tight. |

| Pull the thread gently and help the quill to bend down and away from you using your other hand just as in the band technique. Adjust the stitch by pulling on the thread and the quill at the same time until it is where you want it, then pull the thread tight. You have just made your first stitch using line work. Congratulations! |

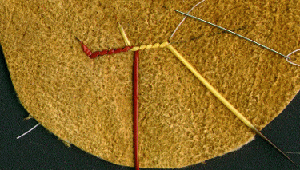
| Continue on in this manner until you come to the place where you want to splice in another quill. The splice is the only tricky part in this technique. Take your last stitch with the first quill, then pick up the thread loop and insert your new quill underneath the first one as shown. Pull the stitch tight again. |

| Now, take your stitch as before, but this time flip both quills up, and take the stitch around both of them at the same time. Adjust the stitch, pulling both the old quill and the new one until the new stitch is exactly the right size. Don't worry about the loose ends. I usually leave them until the quills are completely dry and stiff and then trim them close with a razor blade. I find that if I try to trim the work when the quills are still soft, the splice has a tendency to unravel itself. |

| Continue to work in this manner, trimming the final stitch close to the work when you are done. This technique is very versatile in that you can work easily in either straight lines or in curves to produce different effects. |
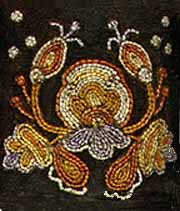
| This is an example of what kind of work is possible using the single-quill line technique. This is a small motif done in the Huron floral style. The quills are dyed with all natural dyes and the background material is brain tanned leather dyed with walnut hulls. |

|
|
| |
Return to NativeTech's Main Porcupine Quillwork Menu

|
Text and Graphics
© 1994 - Tara Prindle unless otherwise cited. |