NativeTech: Native American Technology and Art

|
Porcupine Quillwork
Tools and Materials
for Embroidery Techniques
contributed by Nancy Fonicello
|
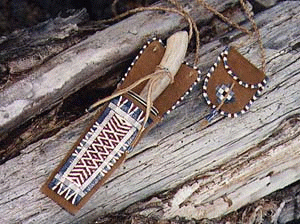
A knife sheath and leather pouch demonstrating a variety
of quillworking techniques. The double-diamond effect
in the center of the knife sheath is achieved using two
rows of four quill plait in mirror image.
|
First of all, it is important to do quillwork on high quality brain
tanned leather. You want a piece of leather that has been wet
scraped, and has very few surface scars. The reason for this
is that you want a nice smooth surface to sew the quills onto.
Dry scraped hides tend to have a rough surface, and scars prevent
the needle from penetrating as it should. If you can't find a
source for good brain-tan, try your hand at it! It is not difficult,
and an excellent discussion of the subject has been contributed
to this web site by
Sundog Traders.
One of the main reasons to use brain-tanned
leather is that the fibers of leather tanned in this way are not
broken or compressed as with commercial (or chemically tanned)
leathers. Good braintan under magnification appears very much
like a piece of felt. A needle and thread passing even part way
through the leather will hold securely, enabling the quillworker
to work only from only one side of the piece. Quillwork would
be infinitely slow if one had to constantly pull the thread through
the back side of the work with every stitch. If this method of
sewing is unclear, see the illustration below regarding the backstitch.
The best thread for the beginning quillworker
is size A nymo. It is easy to work with and even easier to hide
your stitches. However, as soon as you are comfortable, start
using 100% cotton or silk thread. The nymo (nylon) has a tendency
to allow the quills to slip out from underneath, and so doesn't
make the work very durable. Treat your thread with beeswax to
help hold the stitches tight. I prefer a size 12 sharps needle
for most threads, and a size 10 when sewing with real sinew.
If you get brave, you can even use an awl for sinew like they
did in the old days, and then you will surely have an appreciation
for the quality of the old work!
|
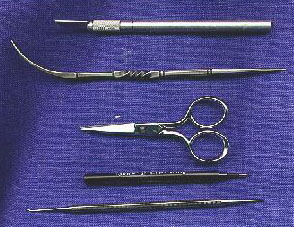
TOOLS FOR THE QUILLWORKER:
These are some of my most useful tools for quillworking. Most of them are commercially available from sewing supply houses and hardware stores. From top to bottom they are as follows:
 Exacto knife with a rounded tip blade:
Most useful for cutting off small ends in the finished work. Keep lots of extra blades on hand and replace them often. A very sharp knife is your friend.
Quill Flattener:
Quill flatteners can come in many shapes and sizes. In historic times they were made of bone or horn, later of metal. Knife maker Dave Berge in Ruidoso, New Mexico made this particular one for me. It has a flattening tool at one end and an awl at the other, making it a very handy item. Sometimes they come with two flattening ends and are S shaped. If you donít have one of these and canít seem to find one, try a tablespoon Ė they work great as well.
Embroidery Scissors:
Any small scissors with sharp tips works well. This is a pair of heavy Gingher embroidery scissors which I use all the time.
Marker Pen:
Used for drawing designs on buckskin. The pen here is a ceramic tipped fine point pen that is waterproof and you can even write on rawhide with it. The only problem with this type is that it is nearly impossible to erase your lines. There is also is a fine tipped marker pen with disappearing ink available in some sewing stores. Note: Make sure your ink if waterproof, as one wet quill will make a mess of your lines.
Dental pick:
Very handy for very fine work, lifting stitches, poking in loose quill ends, etc. I have a dentist friend that supplies me with mine, but sometimes you can find them in the hardwaare and tool stores. Sometimes an awl with a dull point can be substituted, but be careful not to put holes in your quills!
|
A note on putting quills in your mouth:
I know they did it in the old days, and some say that it is the
only way to go, BUT I DON'T! There is a very high incidence of
rabies in the wild animal populations in the East and even some
reports of bubonic plague in the West, and one can never tell
where a porcupine has been....... I find that soaking quills
in a saucer is completely adequate for the task. Once you have
worked with them a little while, you will be able to tell immediately
when a quill has been soaking too long. Just push it out to the
side of the saucer and let it dry a little. Simple!
Quill Embroidery Techniques
The Zig-Zag Technique
The Parallel or Band Technique
The Single-quill Line Technique
Plaiting Techniques
© 1997 -
Nancy Fonicello.
Porcupine Quillwork Bibliography and Books to Buy On-Line
Return to NativeTech's Main Porcupine Quillwork Menu
|

|
Text and Graphics
© 1994 -
Tara Prindle
unless otherwise cited.
|

 Exacto knife with a rounded tip blade:
